Asprova Beginner's Lesson 9 -- Branched process --
30 minutes
Learn by Movie
Download the project file of this lesson.
If you take a look to the documentation, please read the following.
What you will learn in this lesson
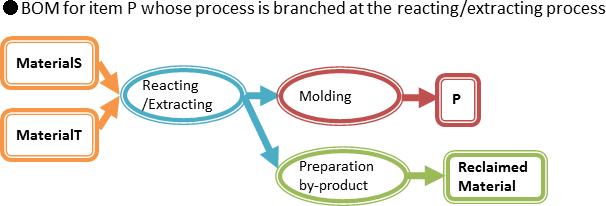
In this lesson, you will learn how to branch a process in the middle of the production process of certain items. By branching a process, you will be able to schedule processes for by-products that are produced in the chemical reaction of raw materials and for restoring and reusing catalysts separately from the production process. You can also use branching to produce left and right car parts that are produced together up to a certain process and then branched into separate processes in the final stages.

The contents of this lesson apply to MS Light module + branch process option and higher modules. The operations described here are for the MS Light module + branch process option.For information on how to switch the module and option, see "How to start Asprova" and "How to switch option for Trial".
Download the project file of this lesson.
If you have questions, please access "Q&A Center" from navigation menu of this web site.
1. Registering and Assigning Branch
When you enter a branch process in the Integrated master of an item, branching operations will be assigned. To branch a process, enter an output instruction at the process where branching is to take place.
■ Procedure
(1) Let's set the Integrated master of a branch process in the Integrated master table.
We will set a branch process in the Integrated master of item A. Choose [Table View]-[Integrated Master Editor].

- Choose [Table View]-[Integrated Master Editor].
| Setting item | Description |
|---|---|
| Instruction code | Enter a character string or number for recognition. The instruction code of an output instruction is set as "Out" by default. However, you can also use another arbitrary code. To enter a branch process, specify a different instruction code for each output instruction. |
| Item/resource | Enter the name of the item that will be output from the process. |
| Previous process number | Enter the process number corresponding to the process that loads the item specified in the output instruction. This number can be omitted if the output item is an item belonging to an immediately following process (linear process). For items that are taken out in the middle of the process (items that are not loaded into another process), specify -1. |
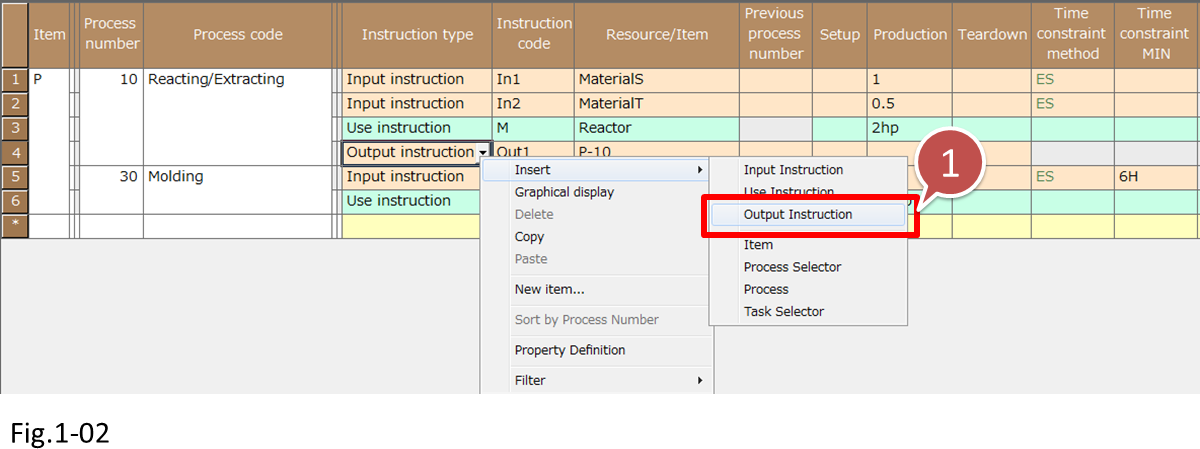
(2) We will set a branch in the [Reacting/Extracting] process. We will set the [Preparation by-product] process so that a branch is created in parallel with the [Molding] process that produces item P. Right-click the row that you want to add an output instruction to. On the pop-up menu, choose[Insert] - [Output Instruction] to add an output instruction row.

- Right-click the row that you want to add an output instruction to. On the pop-up menu, choose [Insert] - [Output Instruction].
Set [Instruction code] to [Out2] and [Item/Resource] to [P-10-Sub].

- Set [Instruction code] to [Out2] and [Item/Resource] to [P-10-Sub].
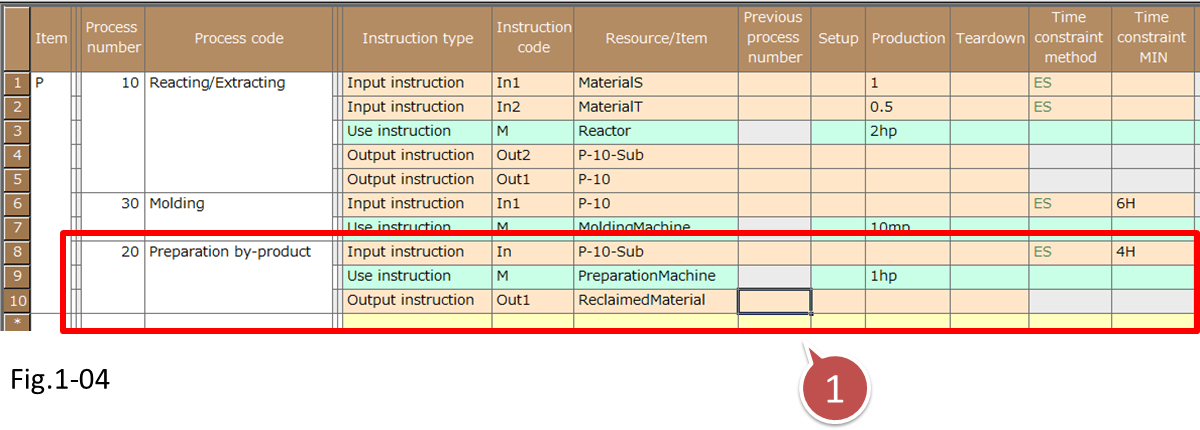
(3) Next, we enter the branch destination process [Preparation by-product]. Enter an Input instruction, Use instruction, and Output instruction as shown in the following figure.

- Enter the branch destination process [Preparation by-product].
You can also enter the Time constraint method and Time constraint MIN in the input instruction of branch processes.
(4) Finally, set the Previous process numbers.
Set the Previous process numbers to the appropriate output instructions and input instructions so that the [Reacting/Extracting] process branches into two processes. Since the item produced in the [Preparation by-product] process is not loaded into the [Molding] process, set the Previous process number of the Output instruction to -1.

- Set the Previous process numbers to the appropriate output instructions and input instructions so that the [Reacting/Extracting] process branches into two processes.
(5) Let's reschedule to see if the Integrated master of the branch process has been entered correctly.
When a reschedule is executed, the operation of each process will be assigned. By looking at the operations assigned to resource [Reactor], we can see that the process has been branched into [Preparation by-product] and [Molding].

To graphically view the Integrated master
Let's use the graphical master view, which shows a graphical representation of the process flow, the relationship of intermediate input and output items, and the resources used by each process, and the production lot size settings.
You can display the graphical master view by right-clicking the appropriate item in the Integrated master table.


The graphical master view allows graphical editing of master data using the mouse and keyboard.
For details, see the online help or section 03, "Graphical Master View," in Knowhow.
Related Materials
For more details on branch processes, see the following materials.
■ Samples
* For details on how to use the samples, see here.


