Asprova Beginner's Lesson 2 -- Single Process --
30 minutes
Learn by Movie
Download the project file of this lesson.
If you take a look to the documentation, please read the following.
What you will learn in this lesson
In this lesson, you will learn how to use the Single-Process scheduling function.
Loading and leveling will be utilized for efficient Process planning.
The Single-Process scheduling function allows scheduling of Operations in a factory manufacturing Process.
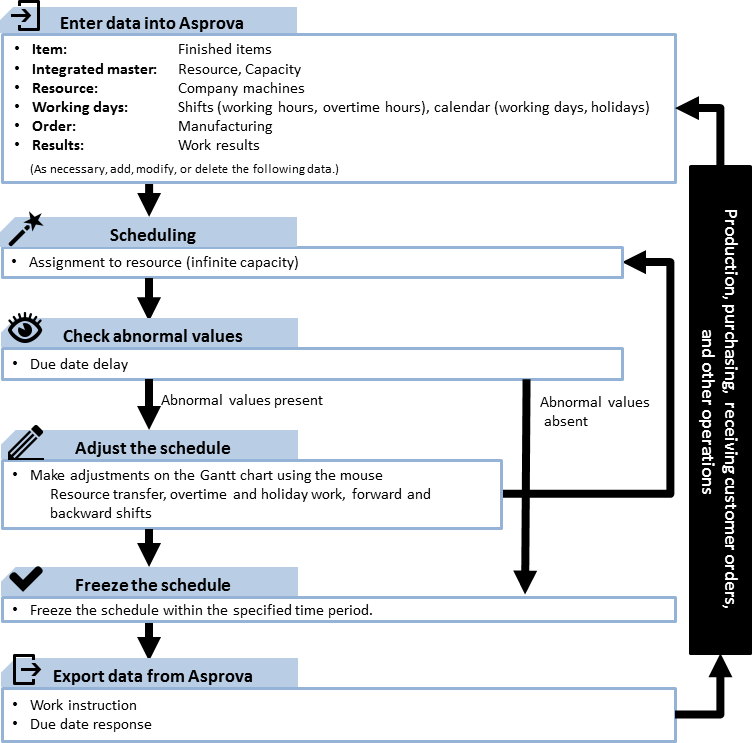
An Asprova Planning and Manufacturing work flow during a typical 3 shift day may look like the following:
| Time | Planners | Manufacturing Site |
|---|---|---|
| 9:00-10:00 |
Input, change, or delete an [Item], [Master], or [Manufacturing order] of each Process. |
|
| 10:00-17:00 | Manufacture according to Work Instructions. Input manufacturing results into the results management system |
|
| 17:30-18:00 | Input results and Reschedule | |
|
18:00-24:00 |
Manufacture according to Work Instructions. Input manufacturing results into the results management system |
Data is inputted into its respective input screen:
- Item/Master: Integrated Master Editor
- Manufacturing Order: Order Table
Click the Reschedule button to create a schedule automatically. Loading or leveling may be selected as needed.Operation priorities can be adjusted manually. Use the mouse to move Resources or adjust the manufacturing date and time. This can be manipulated in the [Resource Gantt Chart] that displays Operation scheduling information graphically.
After adjustments are made, the schedule is exported as Work Instructions.At the manufacturing site, the Item is produced based on Work Instructions, and results information is input.
By incorporating the results information into the schedule, a plan can be created that takes actual results into consideration. In addition, the plan can reflect any added, revised, or deleted Orders and Masters.
Now let’s learn how to use the single Process scheduling function by creating a sample factory Process plan.
The contents of this lesson apply to MRP and higher modules, and the operations described here are for the MRP module. Forinformation on how to switch the module, see "How to start Asprova".
Download the project file of this lesson.
If you have questions, please access "Q&A Center" from navigation menu of this web site.
Target Work, Items & Masters
We will use the single Process scheduling function to perform the planning for the Asprova Planning of Takahashi Electric Corporation's factory in Thailand. At Takahashi Electric Corporation's factory, they use an MRP system, which issues manufacturing orders for this Process we are planning. Until now, the order only specified production quantity and due date, leaving the prioritizing of Operations up to the supervisor or the factory workers.
Given the critical nature of this Process, and due to the importance of proper prioritization of these Operations, the adjusting work must be performed efficiently. Utilizing Asprova’s Single-Process scheduling function helps achieve this goal.
There are three target Items:
- A
- B
- C
Manufacturing Resource and Production Capacity for each Item are as follows:
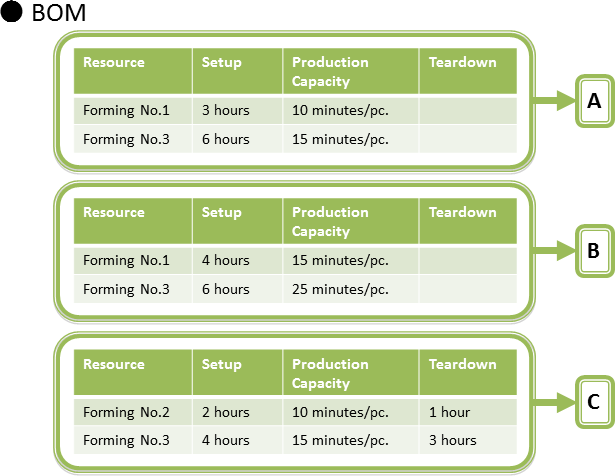
Each Item may be Processed at two Forming Resources. Preferably, however, Items A and B should be Processed at Forming - No. 1, and Item C should be Processed at Forming - No. 2. This is because the capacity for Forming - No. 3 is lower than the other two Resources.
It would be best to manufacture at the highest capacity Resource, and use the lower-capacity Resource only when required because no other Resource is available and timing is critical.
Procedure
1. Entering Data into Asprova
Here, we learn about entering the data required for Single-Process scheduling.
1.1 Entering the Master: Integrated Master Editor
Masters are entered using the [Integrated Master Editor]. Manufacturing Item and Resource information are entered into this table.
Click [Table View] - [Integrated Master Editor] to display the table.

- Item: Item is specified.
- Process Number: Appropriate Process number is specified for use in Work Instructions.
- Process Code: Appropriate Process name is specified for use in Work Instructions.
- Instruction Type: Select [Use Instruction] for Single-Process scheduling.
- Instruction Code: Select [M].
- Resource/Item: Enter the manufacturing Resource and operator.
- Set-up: Specify set-up time if set-up is required.
- Production: Specify production capacity.
- Tear-down: Specify setup time if tear-down is required.
- Resource Priority: Specify here the priority at which this resource is assigned. A bigger value means higher priority.
Enter Item A as follows:

Production capacity is entered using the following format:
- Calculated based on Processing time per unit
- In seconds: sp
- In minutes: mp
- In hours: hp
- Calculated based on Processed quantity per time
- In seconds: ps
- In minutes: pm
- In hours: ph
- Fixed time regardless of quantity Processed
- In seconds: s
- In minutes: m
- In hours: h
Next, enter the Masters for both Items B and C.

1.2 Plan Adjustment Screen: Resource Gantt Chart
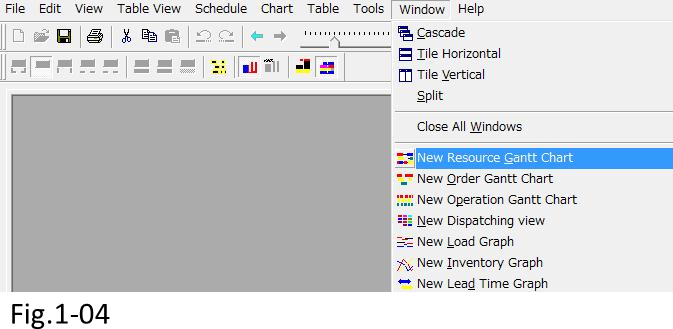
The Resource Gantt Chart is used for a graphical representation of the planning information. Select [Window] - [New Resource Gantt Chart] to display a new Resource Gantt chart.
Resources, such as [Forming - No. 1], which was entered in the [Integrated Master Editor] is displayed. The horizontal axis is a time line and graphically displays start date/time and end date/time for each Operation as assigned through rescheduling.
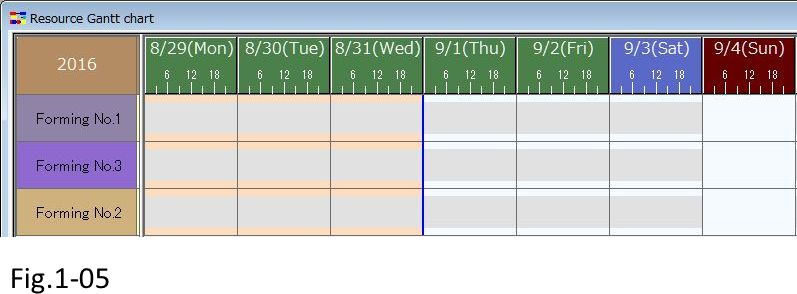
The blue line is the planned start date and time in the Resource Gantt chart. The area with a white background to the right of the blue line is where Operations may be allocated. The area with pink background to the left of the blue line is the time elapsed (past). The planning period or number of past days displayed can be changed in the settings.
To adjust the order in which the entered Resources are displayed, set the order of display in the left part of the Resource Gantt chart. To display more of this left portion, move the cursor to the left edge of the Gantt chart until the cursor changes. Click and drag the border to display more of the left section, enabling Resource information to be revised.

Try setting the display color and display order. Scroll the displayed table portion to find the display color and order.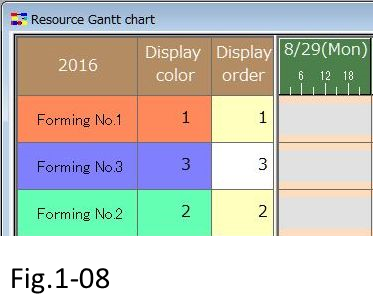
After the colors and order are set, click [View] - [Refresh] to see the Processes displayed in the order specified.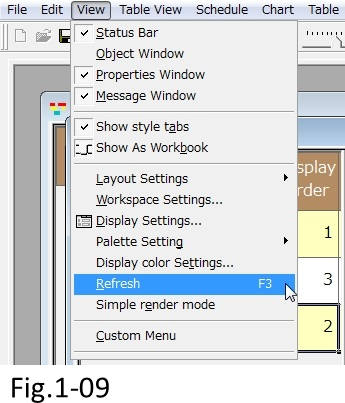

1.3 Entering Orders: Order Table
Orders are entered using the Order Table. Manufacturing orders are entered in this table. Select [Table View] - [Order] to display the Order Table. 
- Order Code: Enter the order code for systems such as the MRP. Specify a unique code, since this code is used to reflect the results.
- Item: Specify the Item code to be produced.
- Due Date: Specify the due date (estimated completion date).
- Order Quantity: Specify the quantity to be produced.
Enter the manufacturing order for Item A as follows:
| Order code | Item | Due Date | Qty | Display Color |
|---|---|---|---|---|
| 0001 | A | 2016/09/02 17:00:00 | 130 | 1 |
| 0002 | A | 2016/09/03 17:00:00 | 100 | 2 |
| 0003 | A | 2016/09/05 17:00:00 | 250 | 3 |

Likewise, enter orders for Items B and C.
| Order code | Item | Due Date | Qty | Display Color |
|---|---|---|---|---|
| 0004 | B | 2016/09/02 17:00:00 | 50 | 4 |
| 0005 | B | 2016/09/03 17:00:00 | 70 | 5 |
| 0006 | B | 2016/09/05 17:00:00 | 30 | 6 |
| 0007 | C | 2016/09/02 17:00:00 | 100 | 7 |
| 0008 | C | 2016/09/03 17:00:00 | 150 | 8 |
| 0009 | C | 2016/09/05 17:00:00 | 130 | 9 |

Order input is complete. We’re now ready to create a plan.
2. Scheduling
Here, we will enter Items, Masters, and Orders to learn about loading and leveling. You should have a good understanding of the order of Operations for each manufacturing Resource, and allocation of Operations among Resources.
2.1 Loading and Leveling
The Reschedule command will be used to allocate manufacturing orders.Click [Window] - [New Resource Gantt Chart] to display the New Resource Gantt Chart.

No schedules have been allocated yet. Run the Reschedule command.

Now the Operations have been allocated on the Gantt chart, but there are overlaps in some Operations.This is because the scheduling parameter of the scheduling logic is set to [Backward Scheduling]. When loading, the load on the manufacturing Resource is not taken into consideration.
This will result in a similar schedule as the MRP system.This is not suitable for adjusting the implementation order of these Operations. So what should we do? In Single-Process scheduling, we can use [Backward Sequencing]. Use the drop-down menu to select [Backward Sequencing] as the scheduling parameter.
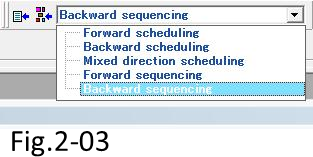
Using the [Backward Sequencing] parameter for scheduling results in fewer overlaps in the manufacturing order.
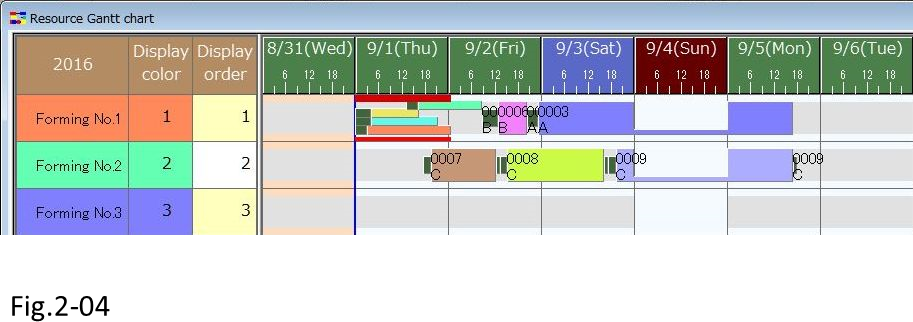
However, some Operations have been assigned to the left of the blue line, i.e., Earlier than the reference date/time for this plan. This indicates that there is not enough manufacturing time, if we are to use just Forming - No. 1. In addition, some areas where Item A and Item B being manufactured alternately. No Operations have been assigned to Forming - No. 3 due to its low production capacity, but there is not enough time if we limit ourselves to Forming - No. 1. We will have to include Forming - No. 3 in our adjustments.
2.2 Adjusting the Operation Schedule: Moving Operations Manually
You can click the Operation bar on the Resource Gantt chart to drag-and-drop Operations to the past or the future. Operations may also be reallocated between Resources.
Two key points to our adjustment are:
- 1. To avoid any Operations from being allocated in the past, we will enable allocations to Forming - No. 3, and reallocate these Operations to the future.
- 2. We need to minimize alternating production between Item A and Item B.
Let’s begin with 1. No Operations are allocated to Forming - No. 3, so we will move Operation [0006:20] for Item B to create some free time for Forming - No. 1.

As soon as Operation [0006:20] is moved, the length of the Operation bar changed. Production time is automatically recalculated using the information contained in the Integrated Master Editor, so adjustments can be made while taking into consideration any changes in production time.
A different Item A Operation can now be moved into the free spot. Now that there is more room on the chart, other Operations can be allocated from the past to the future. Move other Operations for Forming - No. 1 accordingly.
Let’s not forget point 2. If Operations for Item B are allocated to Forming - No. 3, these Operations can be run continuously, so we will move Operations [0004:20] and [0005:20].
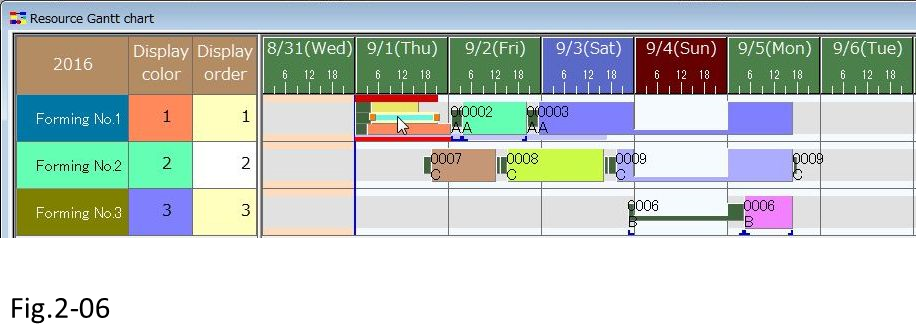
While shifting Operations, a purple underline will appear. This indicates the period in which the Operation should be allocated to avoid any late due dates. Be aware that any red letters indicate late due date.
Adjust all Operations in this manner until the developed plan can be used as instructions.

In addition, when an Operation is moved, it becomes fixed, as indicated with a blue mark. Any fixed Operations are allocated to the same position at the next rescheduling.
3. Export data from Asprova
Here, you will learn to output the details of the schedule as Work Instructions. It will be output to a text file.
3.1 Specifying the Instruction Period
Schedule adjustment has been completed. Now generate the instructions for the production site. To generate instructions, first specify the instruction output range in the Resource Gantt chart. Click the left-most column in the Gantt chart to select an entire row. Click and drag to select multiple rows.
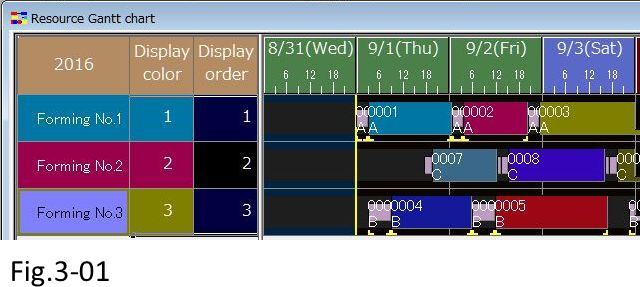
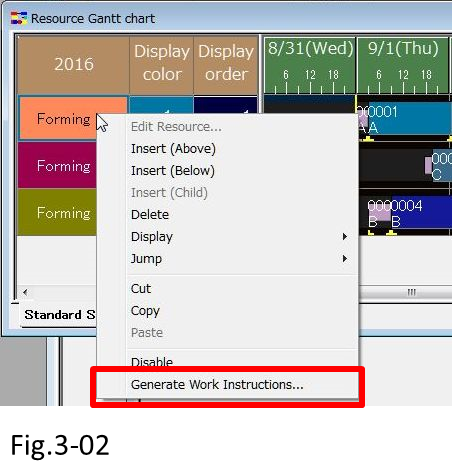
After selecting a row, right-click to display a pop-up menu. Select [Generate Work Instructions...] from the menu.
Work instructions generation dialog is displayed. Specify the period for which the instructions should be displayed. In this case, do not change the start date/time, but change the end date/time to [2016/09/02].
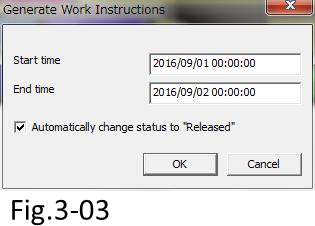
When [Automatically change the status to [Released]] checkbox is checked, the status of Operations that are set to begin between the start date/time and end date/time are changed to [Released]. Operation status progresses as follows: [Released] -> [Frozen] -> [Started] -> [Completed]. ([Released] or [Frozen] statuses can be skipped in the setting to complete the Operation.)
Click the [OK] button to display the Work Instructions Table. This may be printed or exported as a PDF file to be used as instructions. Since [Automatically change the status to [Released]] checkbox was clicked, then the [OK] button was clicked, let’s check the Resource Gantt Chart.

Green underlines are displayed for Operations that have been displayed in the Work Instructions Table (Operations beginning on 9/1). This indicates these Operations have been released.
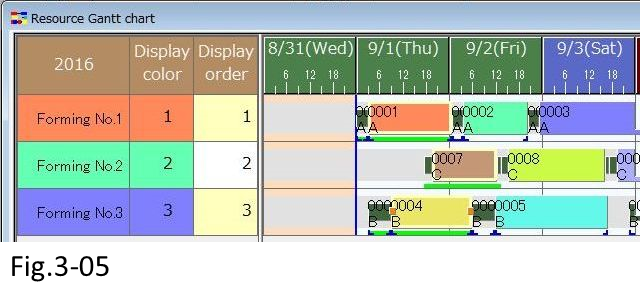
Next, let’s output the schedule information to a text file.
3.2 Exporting Work Instructions as a Text File
Use the Export command to output information externally. When you click [File] - [Export], the program creates an [Operation.tbl] file into the same folder as the project file.

A file has been generated in the folder where the project file is saved. Open this exported file to check that it contains the schedule information. Allocated Resources, start date/time, and end date/time are indicated for each Operation.
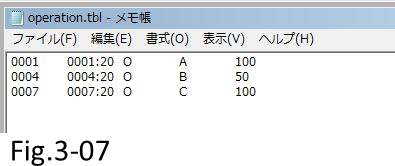
The above is the basic workflow from Input to Scheduling to Instruction output. At The manufacturing site will receive the instructions, implement the Operations, and then input their results. The MRP system issues new manufacturing orders based on any new orders (demand).
Next, we will move on to entering results and additional orders.
4. Data Input of Results
We will enter the results into Day 1’s Operations to create a plan that takes results into consideration.
4.1 Input Results into Day 1 Plan
Let’s input results for Operations that were scheduled to begin on Day 1.
The results are entered into the Resource Gantt Chart. Right-click the Operation where results are to be entered, and select [Operation] - [Results].
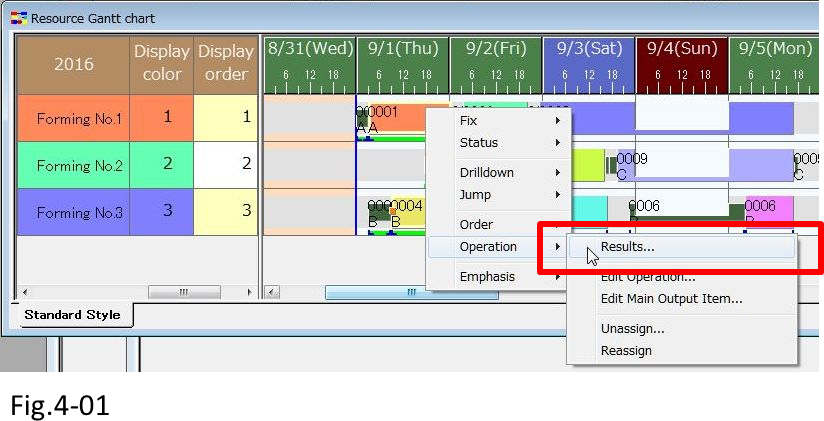
Enter the results into the displayed dialog.
| Operation Code | Status | Reported Start Date/Time | Reported End Date/Time | Reported Qty |
|---|---|---|---|---|
| 0001:10 | Completed | 2016/09/01 03:00:00 | 2016/09/01 23:00:00 | 130 |
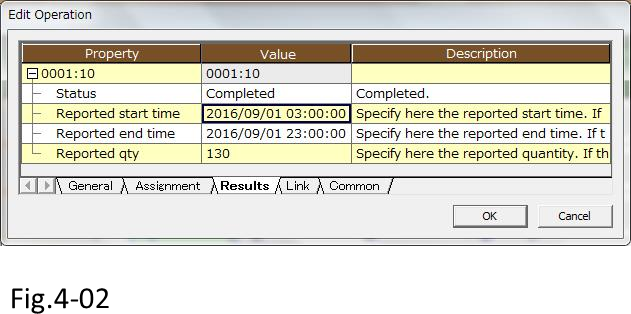
After the results are entered, the instruction bar display on the Resource Gantt Chart will change.
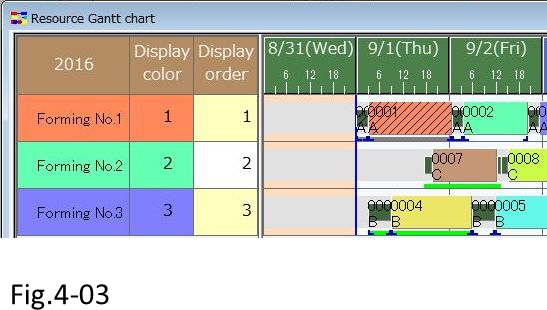
If the status is [Started] or [Completed], there will be diagonal strokes over those Operations, giving a graphical representation of the progress.
Let’s enter results for other Operations as well.
| Operation Code | Status | Reported Start Time | Reported End Time | Reported Qty |
|---|---|---|---|---|
| 0004:10 | Started | 2016/09/01 07:00:00 | 40 | |
| 0007:10 | Started | 2016/09/01 17:40:00 | 40 |

4.2 Incorporating Results into the Schedule
When the results from Day 1 have been entered, shift the blue line that indicates the planned date/time to the right by one day. Move the cursor to the top of the blue line on the Resource Gantt Chart.
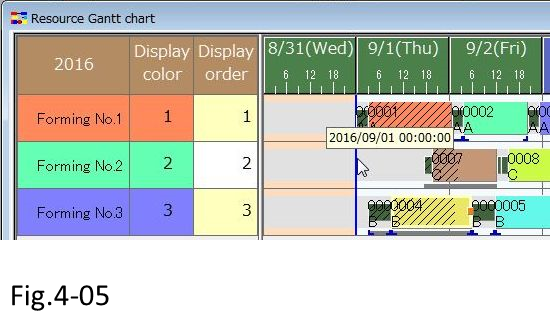
Once the cursor changes shape, drag the cursor so that the date/time on the tool tip shows [2016/9/2 00:00:00].
When you release the mouse button, the blue line moves to the designated date/time.

Now the first day’s results have been entered the planning period has been moved forward one day.
Let’s run the Rescheduling command. There have been no extreme delays, but the production times of future Operations have been revised in accordance with the previous day’s performance.
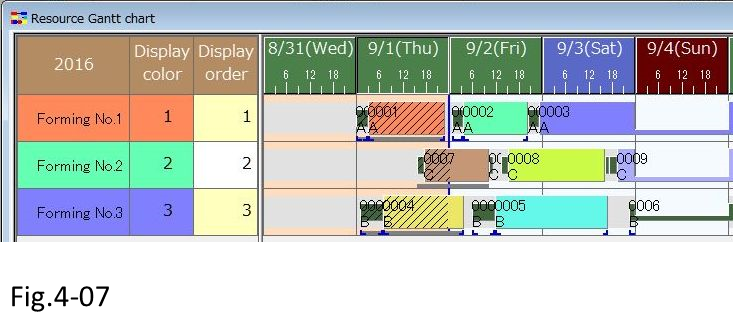
By correctly entering results, it becomes possible to develop a highly accurate plan that takes actual progress into account.
5. Adding New Orders
Results have been entered, and the plan has moved forward one day. We will add a new manufacturing order that has been entered in an external system, and then Reschedule this plan.
5.1 Rescheduling after Entering New Orders
First, we must enter new manufacturing orders. You may recall that orders are entered using the Order Table.
Let’s display the Order Table and enter new orders.
| Order Code | Item | Due Date | Qty | Display Color |
|---|---|---|---|---|
| 0010 | A | 2016/09/03 17:00:00 | 105 | 10 |
| 0011 | B | 2016/09/06 17:00:00 | 40 | 11 |
| 0012 | C | 2016/09/06 17:00:00 | 125 | 12 |

Order [0010] is an expedited order with a 9/3 due date. However, because Resource capacity was insufficient, rescheduling allocated this order in the past.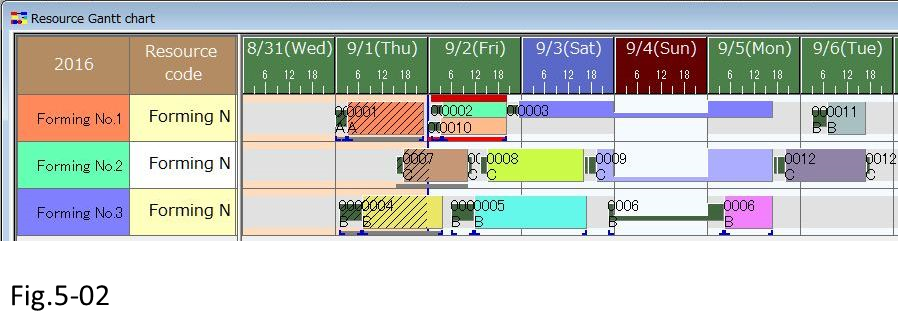
We must move Operations for [0010] from the past to the correct time period. But we must first move [0011] to [Forming – No. 3] to free up some time. [0003] is displayed in red letters, showing that due date will be delayed. Other Resources do not have any spare time, so it cannot be allocated to other Resources either.
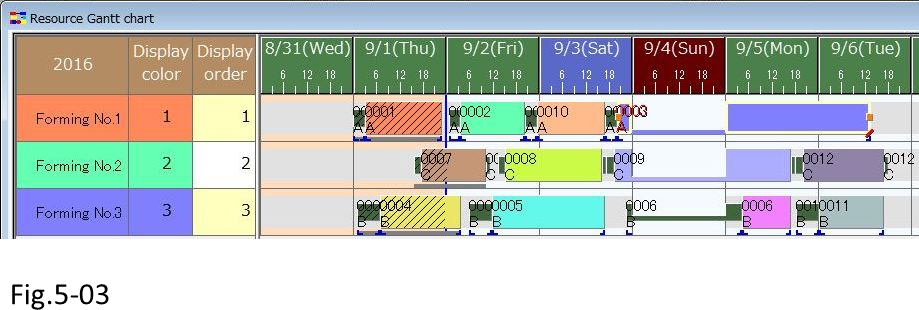
In these situations, we can still confirm approximately when production will wrap up, which can be useful for due date estimation and adjustments.
5.2 Changing the Calendar to Adjust Operation Times
If there is no free time, shifts and calendars may be adjusted to secure production time.
Let’s change 9/4 for [Forming - No.1] to a working day.
Right click on this cell to display the pop-up menu. The bottom part of this menu shows [All Day] and [Holiday].
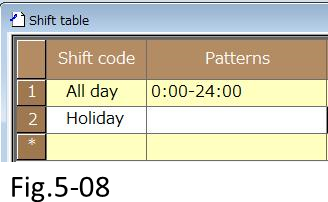
These are the entered shifts.

Click [All Day] to secure work time on 9/4 for [Forming - No.1].
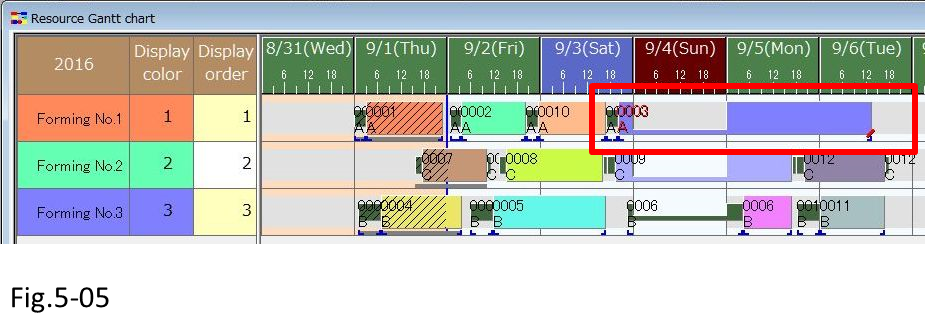
Since work time has been secured, work can be performed ahead of schedule, so let’s move Operation [0003].
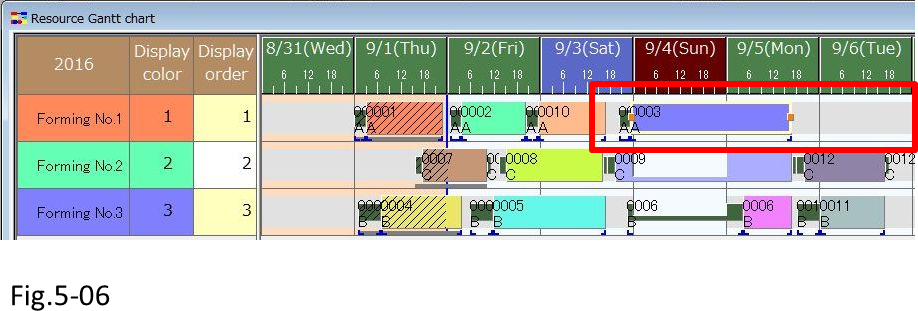
Now the production can commence as planned without due date delay. Similarly, if days off, non-operating days, and overtime can be adjusted, adjusting the operating time may be an option to avoid delay in due date.
Shifts or calendars can be entered or changed in the Shift Table or the Calendar Table, respectively. Be sure to enter any necessary shifts or calendars in advance.
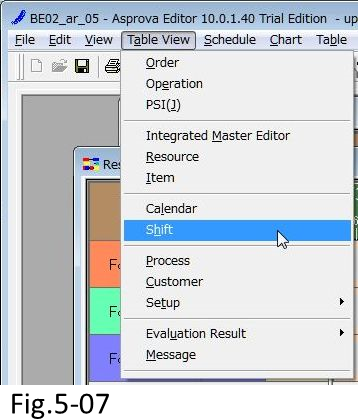
Use the Shift Table to set the Shift Code and the pattern of operating hours during the day. Shift Codes are used when changing operating times on the Gantt chart, so it will be useful to have various overtime patterns entered in advance. Under Patterns, set the operating hours. Connect times using a hyphen to create operating hours. When listing multiple operating hours, separate them using semicolons.
In the Calendar Table, set up the shift for each day or each Resource.
Resource Codes used in Calendar Settings are set under [Resource]. An asterisk (*) means the setting is applicable to all Resources. Dates used in Calendar Settings are set under [Date or Day of the Week]. In addition to setting specific dates, days or the week or a range can be set using a hyphen. For example, [Mon - Sat] means Monday through Saturday.
[Sort Order] is used to set the priority of calendar records. Records higher in the sort order are given higher priority. Applicable shifts should be set under [Shift Code].

Summary
We hope you have gained an understanding of the basic flow in the planning Operation using the Single-Process scheduling function. Before moving on to the next step, let us review the Single-Process scheduling function. Single-Process scheduling function allows scheduling of Operations in a factory manufacturing Process. The following Asprova data input tasks may be performed:
- Input, change, or delete an [Item], [Master], or [Manufacturing Order] of each Process.
- Execute a [Reschedule] to plan Operations.
- Output scheduling information as Work Instructions.
- Input results.
An Asprova Planning and Manufacturing work flow during a typical 3 shift day may look like the following:
| Time | Planners | Manufacturing Site |
|---|---|---|
| 9:00-10:00 |
Input, change, or delete an [Item], [Master], or [Manufacturing order] of each Process. Output scheduling information as Work Instructions. |
|
| 10:00 - 17:00 | Manufacture according to Work Instructions. Input manufacturing results into the results management system |
|
| 17:30-18:00 | Input results and Reschedule | |
|
18:00-24:00 |
Manufacture according to Work Instructions. Input manufacturing results into the results management system |
This procedure is repeated each planning cycle to create a schedule. The aim here is to create and maintain a highly accurate plan by incorporating the latest information, such as results and additional manufacturing orders.


